


PostgreSQL is an open-source, versatile, and most popular database system around the world. However, it does not have any features for high availability.
Enter Patroni. Patroni is a cluster manager tool used for customizing and automating deployment and maintenance of high availability PostgreSQL clusters. It is written in Python and uses etcd, Consul, and ZooKeeper as a distributed configuration store for maximum accessibility. In addition, Patroni is capable of handling database replication, backup, and restoration configurations.
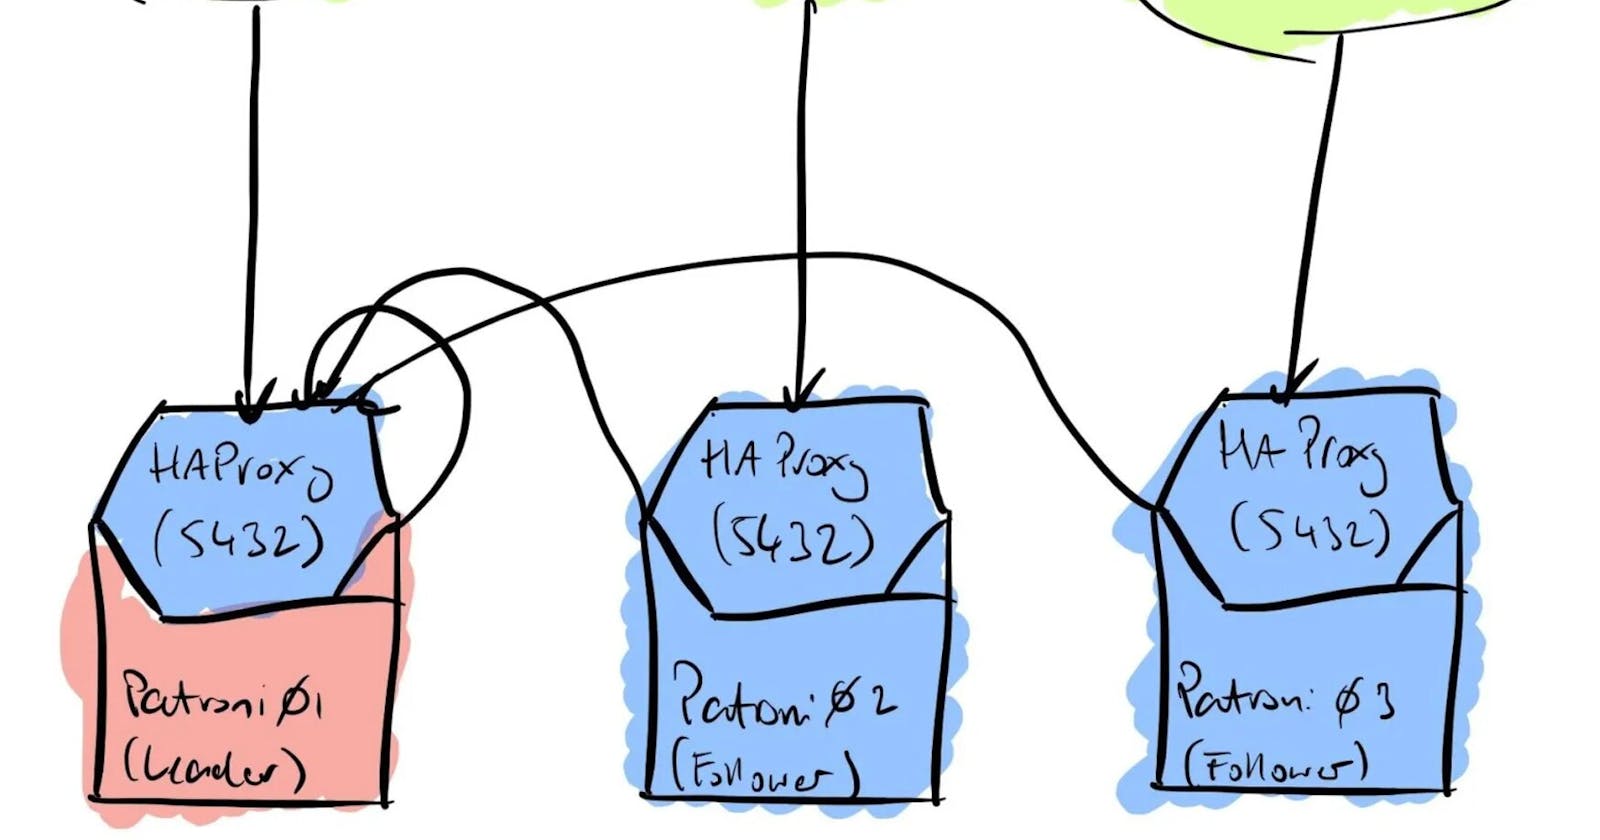
Main Components of PostgreSQL cluster
• Patroni provides a template for configuring a highly available PostgreSQL cluster.
• ETCD stores the state of the PostgreSQL cluster. When any changes in the state of any PostgreSQL node are found, Patroni updates the state change in the ETCD key-value store. ETCD uses this information to elects the master node and keeps the cluster UP and running.
• HAProxy keeps track of changes in the Master/Slave nodes and connects to the appropriate master node when the clients request a connection.
In this guide, we will show you how to set up a four-node PostgreSQL cluster with Patroni on Ubuntu 20.04.
Prerequisites
• Four servers running Ubuntu 20.04.
• A root password is set up on each server.
Use the following setup to identify the IP address and application of each node.
| Servers | Application | IP Address |
| node1 | Postgres, Patroni | 69.87.217.177 |
| node2 | Postgres, Patroni | 45.58.39.238 |
| node3 | etcd | 45.58.42.212 |
| node4 | HAProxy | 45.58.47.24 |
Installing PostgreSQL
The first step you will need to do is to install the PostgreSQL server on node1 and node2. Run the following command to install PostgreSQL on both nodes.
apt install postgresql postgresql-contrib -y
After the installation, you will need to stop the PostgreSQL service on both nodes:
systemctl stop postgresql
Next, you will need to symlink /usr/lib/postgresql/12/bin/ to /usr/sbin because it contains tools used in Patroni.
ln -s /usr/lib/postgresql/12/bin/* /usr/sbin/
Installing Patroni, ETCD, and HAProxy
First, install all the required dependencies on node1 and node2 using the command below:
apt install python3-pip python3-dev libpq-dev -y
Next, run the following command to upgrade PIP to the latest version:
pip3 install --upgrade pip
Finally, use the PIP command to install the Patroni and other dependencies on both node1 and node2:
    pip install patroni
    pip install python-etcd
    pip install psycopg2
At this point, Patroni has been installed on node1 and node2.
Next, go to node3 and install the ETCD using the command below:
apt install etcd -y
After the successful installation, log in to node4 and install the HAProxy using the command below:
apt install haproxy -y
Configuring ETCD and Patroni
The ETCD main configuration file is located at /etc/default/etcd.
Edit the /etc/default/etcd file using your favorite editor on node3:
nano /etc/default/etcd
Add the following configuration:
ETCD_LISTEN_PEER_URLS="http://45.58.42.212:2380,http://127.0.0.1:7001"
ETCD_LISTEN_CLIENT_URLS="http://127.0.0.1:2379, http://45.58.42.212:2379"
ETCD_INITIAL_ADVERTISE_PEER_URLS="http://45.58.42.212:2380"
ETCD_INITIAL_CLUSTER="etcd0=http://45.58.42.212:2380,"
ETCD_ADVERTISE_CLIENT_URLS="http://45.58.42.212:2379"
ETCD_INITIAL_CLUSTER_TOKEN="node1"
ETCD_INITIAL_CLUSTER_STATE="new"
Save the file, then restart the ETCD service to apply the configuration changes.
systemctl restart etcd
To verify the ETCD status, run:
systemctl status etcd
Output:
 ● etcd.service - etcd - highly-available key value store
         Loaded: loaded (/lib/systemd/system/etcd.service; enabled; vendor preset: enabled)
         Active: active (running) since Wed 2021-07-07 04:42:33 UTC; 4s ago
           Docs: https://github.com/coreos/etcd
                 man:etcd
       Main PID: 1525 (etcd)
          Tasks: 9 (limit: 2353)
         Memory: 19.7M
         CGroup: /system.slice/etcd.service
                 └─1525 /usr/bin/etcd
Next, you will need to create a patroni.yml file on both node1 and node2.
On node1, create a new patroni.yml file:
nano /etc/patroni.yml
Add the following configuration:
 scope: postgres
    namespace: /db/
    name: postgresql0

    restapi:
        listen: 69.87.217.177:8008
        connect_address: 69.87.217.177:8008

    etcd:
        host: 45.58.42.212:2379

    bootstrap:
        dcs:
            ttl: 30
            loop_wait: 10
            retry_timeout: 10
            maximum_lag_on_failover: 1048576
            postgresql:
                use_pg_rewind: true

        initdb:
        - encoding: UTF8
        - data-checksums

        pg_hba:
        - host replication replicator 127.0.0.1/32 md5
        - host replication replicator 69.87.217.177/0 md5
        - host replication replicator 45.58.39.238/0 md5
        - host all all 0.0.0.0/0 md5

        users:
            admin:
                password: admin
                options:
                    - createrole
                    - createdb

    postgresql:
        listen: 69.87.217.177:5432
        connect_address: 69.87.217.177:5432
        data_dir: /mnt/patroni
        pgpass: /tmp/pgpass
        authentication:
            replication:
                username: replicator
                password: password
            superuser:
                username: postgres
                password: password
        parameters:
            unix_socket_directories: '.'

    tags:
        nofailover: false
        noloadbalance: false
        clonefrom: false
        nosync: false
Save the file, then create a data directory for Patroni and set proper ownership on node1:
    mkdir -p /mnt/patroni
    chown postgres:postgres /mnt/patroni
    chmod 700 /mnt/patroni
On node2, create a new patroni.yml file:
nano /etc/patroni.yml
Add the following configuration:
scope: postgres
    namespace: /db/
    name: postgresql0

    restapi:
        listen: 45.58.39.238:8008
        connect_address: 45.58.39.238:8008

    etcd:
        host: 45.58.42.212:2379

    bootstrap:
        dcs:
            ttl: 30
            loop_wait: 10
            retry_timeout: 10
            maximum_lag_on_failover: 1048576
            postgresql:
                use_pg_rewind: true

        initdb:
        - encoding: UTF8
        - data-checksums

        pg_hba:
        - host replication replicator 127.0.0.1/32 md5
        - host replication replicator 69.87.217.177/0 md5
        - host replication replicator 45.58.39.238/0 md5
        - host all all 0.0.0.0/0 md5

        users:
            admin:
                password: admin
                options:
                    - createrole
                    - createdb

    postgresql:
        listen: 45.58.39.238:5432
        connect_address: 45.58.39.238:5432
        data_dir: /mnt/patroni
        pgpass: /tmp/pgpass
        authentication:
            replication:
                username: replicator
                password: password
            superuser:
                username: postgres
                password: password
        parameters:
            unix_socket_directories: '.'

    tags:
        nofailover: false
        noloadbalance: false
        clonefrom: false
        nosync: false
Save the file, then create a data directory for Patroni and set proper ownership on node2:
mkdir -p /mnt/patroni
    chown postgres:postgres /mnt/patroni
    chmod 700 /mnt/patroni
Creating Systemd Unit File for Patroni
Next, create a systemd unit file for managing Patroni service on node1 and node2:
nano /etc/systemd/system/patroni.service
Add the following configuration:
 [Unit]
    Description=Runners to orchestrate a high-availability PostgreSQL
    After=syslog.target network.target

    [Service]
    Type=simple

    User=postgres
    Group=postgres

    ExecStart=/usr/local/bin/patroni /etc/patroni.yml
    KillMode=process
    TimeoutSec=30
    Restart=no

    [Install]
    WantedBy=multi-user.targ
Save the file, then reload the systemd daemon:
systemctl daemon-reload
Next, start the Patroni and PostgreSQL service on both node1 and node2:
 systemctl start patroni
 systemctl start postgresql
To verify the status of Patroni, run:
systemctl status patroni
Output:
Runners to orchestrate a high-availability PostgreSQL
         Loaded: loaded (/etc/systemd/system/patroni.service; disabled; vendor preset: enabled)
         Active: active (running) since Wed 2021-07-07 05:05:52 UTC; 19s ago
       Main PID: 11915 (patroni)
          Tasks: 5 (limit: 2353)
         Memory: 22.4M
         CGroup: /system.slice/patroni.service
                 └─11915 /usr/bin/python3 /usr/local/bin/patroni /etc/patroni.yml
Configuring HAProxy
Next, edit the HAProxy main configuration file on node4:
nano /etc/haproxy/haproxy.cfg
Remove default configuration and add the following configuration:
global
        maxconn 100

    defaults
        log global
        mode tcp
        retries 2
        timeout client 30m
        timeout connect 4s
        timeout server 30m
        timeout check 5s

    listen stats
        mode http
        bind *:7000
        stats enable
        stats uri /

    listen postgres
        bind *:5000
        option httpchk
        http-check expect status 200
        default-server inter 3s fall 3 rise 2 on-marked-down shutdown-sessions
        server postgresql_69.87.217.177_5432 69.87.217.177:5432 maxconn 100 check port 8008
        server postgresql_45.58.39.238_5432 45.58.39.238:5432 maxconn 100 check port 8008
Save the file, then restart the HAProxy service to apply the changes:
systemctl restart haproxy
To verify the status of HAProxy, run:
systemctl status haproxy
Output:
 ● haproxy.service - HAProxy Load Balancer
         Loaded: loaded (/lib/systemd/system/haproxy.service; enabled; vendor preset: enabled)
         Active: active (running) since Wed 2021-07-07 05:07:57 UTC; 5s ago
           Docs: man:haproxy(1)
                 file:/usr/share/doc/haproxy/configuration.txt.gz
        Process: 1583 ExecStartPre=/usr/sbin/haproxy -f $CONFIG -c -q $EXTRAOPTS (code=exited, status=0/SUCCESS)
       Main PID: 1590 (haproxy)
          Tasks: 2 (limit: 2353)
         Memory: 1.8M
         CGroup: /system.slice/haproxy.service
                 ├─1590 /usr/sbin/haproxy -Ws -f /etc/haproxy/haproxy.cfg -p /run/haproxy.pid -S /run/haproxy-master.sock
                 └─1595 /usr/sbin/haproxy -Ws -f /etc/haproxy/haproxy.cfg -p /run/haproxy.pid -S /run/haproxy-master.sock
Accessing PostgreSQL Cluster
You can now access the PostgreSQL cluster using the HAProxy IP address. To do so, open your web browser and type the URL http://45.58.47.24:7000. You should see your cluster status on the following screen:

As you can see, the row highlighted in green is acting as a master, and the row highlighted in red is acting as a slave.
Conclusion
Congratulations! you have successfully deployed a four-node Patroni cluster on Ubuntu 20.04 server. However, it is recommended to add more ETCD nodes to improve availability and add an HAProxy server for IP failover.